Showing posts with label fussy cut. Show all posts

Saturday, June 20, 2015

Christmas Z-Fold Card Insanity (Project 48)

Warning: this will be a really long post with lots of pictures and detailed descriptions of one card.

As promised, here is the second Z-fold card I made. And this was one of those ideas that sounded really good in my head and then about 1/3 of the way through, I realized that it was actually insane. I think I spent about 10 + hours making this card. And I'm not sure if I'm going to give it away or keep it for myself. I'm just not sure I like anyone I like enough to give this too. :-) I'm either going to put it out with my Christmas decorations or maybe add some squirrels and give it to my mom since she puts all the cards I've made for her over the years out with her Christmas decorations.


I started by drawing a triangle on each section to create a base shape for the tree. Since I improvised on the z-fold cut to make my tree base and insure that the whole tree lines up when the card is folded, I've included at the bottom of the posts photos and an explanation of how I did it.

Since I was going to use die cut pine needles to create the tree, I knew there would be gaps. So I used painter's tape to mark off the partial triangle on the front section and inked it with Distress Ink in Mowed Lawn and, what else, Pine Needles. I wished I had taken some pics while I was doing this.

 I die cut the pine needles from snippets of watercolor cardstock. It is an Impression Obsession die.  Then I colored them with Distress Ink in Mowed Lawn and Pine Needles. I know it would have been faster to color the paper first and die cut second but then the sides would still be white, which would have bugged me. I have slight crafting OCD tendencies. Then began the epic assembly process by attaching each one individually. Here's a pic of what the individual pine needles look like, with a dime for some perspective on the size. For non-Americans, a dime is about 1.8cm in diameter.

 
The trunk is a piece of brown floral tape attached at the top (before I added the pine needles). The bottom 2 rows of each section were attached with glossy accents and the rest were attached with rolled pieces of scor-tape to give some dimension.  There are 43 pine needle branches on the front section.


I couldn't decide if I liked the full sun or in the shade photos better, so included both.  For the garlanded, I attached pieces of ribbon that I folded the edges under the pine needles to give the illusion of it wrapping around the tree.  


Here's the middle section, with the front folded back, so you see the middle section and the bottom section.  There are 54 pine needle branches on the middle section.

 
And the full sun picture.


Here it is with the whole card unfolded.  This is the back of the card.  For the sentiment, I die cut the red and white cardstock with Spellbinders' nesties.  It is one of the label sets but I forget which one.  The sentiment is by Impression Obsession. I stamped with ColorBox Pigment ink in Evergreen and since it usually takes forever to dry, I heat embossed it with clear embossing powder.  I realized when I went to attach it that it was a little to big for the section, so I had to attach it at a wonky angle to fit.  I added a couple of gems.  I think that was because I smudged some ink on the white cardstock. 

 
Here's just the middle by itself.  I realized as I was drafting this, I didn't have a pic of just the middle without the bottom layer showing, so I took another pic but by that time the sun was hiding.


Now for the bottom section (the inside of the card), which had the full tree on it.  The star on top of the tree is a die by My Favorite Things colored with metallic watercolor paint and with a gem at the center.  And this section has 69 pine needle branches.  So that's 166 individually colored and attached pine needle branches. Yep, I'm a little crazy. In full sun:
 
 
And in the shade.  I added a dime to give perspective on the ornaments.  


The ornaments are My Favorite Thing stamps. I used the pieces of cardstock cut off from the card base for stamping them. The first batch I stamped with Versafine. Since I didn't stamp nearly enough the first time, I stamped the second batch with Versafine and embossed with clear embossing powder, because after I colored the first batch, the lines on some of the ornaments didn't show up as well. On some of them I embossed a snowflake with clear embossing powder. It was part of a three snowflake stamp also by My Favorite Things that I did surgery on. I colored them all with metallic water colors, added glossy accents, cut each out and attached with rolled pieces of scor-tape. I also added sequins with a dot of Stickles in the middle and gems for sparkle. This close-up (of the bottom section) shows the ornaments better.
 
 
You can really see the sparkle in the full sun one. Again this is the bottom section. 

 
When I attached the trunk, I only adhered the top down because I wanted to be able to tuck the ribbon for the tree skirt under the trunk so that it would look like the tree skirt went around the whole trunk.  It took a bit of trial and error to get the tree skirt to work.  I used a snippet of wired ribbon to create the skirt, tucking it behind the trunk and then folded over the top. The presents are My Favorite Things stamp, except the gold one, which is Hero Arts.  I stamped all but the far left one on snippets of pattern paper, embossed, used the watercolor metallic paint for the ribbons and fussy cut. The far left one was stamped on snippets of plain white cardstock and painted with metallic paints.    

In this close-up of the front section, you can see that I got better at attaching the tree skirt as I went along.  The presents were a strategic choice to hide the worst of the lumps.

 
Here is the card fully open to show the inside.  The inside sentiment is by Stampendous.  Oh and the green pattern paper on the 2 non-tree panels were snippets as well.
 
Full Sun


Partial Shade


Since this card is literally covered with snippets, I'm going to share it over at the playground.
 
 
Thanks for stopping by and please come again. 
 
Now for the detailed directions for creating the card base, which I figured I would put at the bottom so you didn't have to read through/ scroll through them to get to the good stuff, but you could look if you were interested.
 
For the Z-fold you need a piece of cardstock that is 6 inches by 12 inches (15.3 cm by 30.6 cm - I think I have conversions right).  I used a scrap piece for these pics because I forgot to take pics while I was making it and the piece was only 5.75 inches by 12 so if it looks a little off that’s why.  Here's a picture on the starting piece with all the measurements on it.  They will be explained in steps 1-3.
 

1) You are going to measure up 3 inches (7.6 cm) on one side and draw a diagonal line to the opposite corner.  That is your usual cut line for a z-fold line. 
 

2) Flip the paper over and draw the diagonal line again, making sure you measure up the 3 inches on the same side that you did on the front. This will give you a guide line for the middle section, which when the card is folded is actually the back of the piece of paper.
 
 
 3)  Then score at 4 inches (10.1 cm) and 8 inches (20.2 cm) across.  These are your fold lines.  That way each section is 4 inches wide.  Here’s a pic of the front with all the measurements and the diagonal cut line draw in.
 
4) Fold you card at the 4 and 8 inch score lines to make your Z. 

5) Now, on the front panel, find the center point of the top and draw a triangle with a ruler.  I also added the trunk and line for the tree skirt. The diagonal line is the cut line.  The straight line is showing that it is 4 inches wide.


6) Now cut just the front section along the cut line and then up the folded edge to the top.  That way you can see the middle section when the card is folded.
 
 
7) Line the ruler up using the edge of the tree on the front section to draw the top of the tree on the middle section.


8) Then on the front panel measure up from the bottom of the card to the bottom of the tree. 
9) Use that measurement to draw the bottom line of the tree on the middle section. 
 
 
10) Then connect the bottom of the tree to the top part you already drew. 
 
 
11) Again, cut along the cut line (for the middle section this time) and the fold.  This is where drawing the cut line on the back comes in handy.  Now you can see the bottom section when the card is folded.


12) Repeat steps 8 to 10 for the back section.  When you go to cut this time, cut along the cut line until you get to the tree top.  Then cut up the tree top then down the other side to the cut line, across the cut line to the fold and then up the fold.  Now you have a tree base.  


Now you too can join my insanity.  And I did warning at the beginning this would be a long one.  So thanks for hanging in there for all my long drawn out explanations. 

Wednesday, June 17, 2015

A Couple More AIR 15 Cards (Projects 46 & 47)


Even though AIR 15 if over, I’ve got a couple of more projects from AIR15 to share with you. 
The first card involves a z-fold.  Here is a link to the FarNorth’s blog posting with instructions on how to do a z-fold.  Here's a pic where you can see the z of the fold.
I decided that I wanted to create a scene that went across all three layers and I went with a beach scene.    Instead of cutting along the diagonal, I drew a line on both sides of the paper so I could use that as a guide for stamping.  Then I fussy cut the top part off so that instead of having a straight line.
 
The front panel is the ocean. I stamped the waves with Versamark and heat embossed with clear embossing powder. Then I stamped the fish with Versafine.  I added the bubbles, stamped with Versamark and heat embossed with clear embossing powder.  I inked around the fish with Distress Ink in Salty Ocean. I colored the fish with Squeezed Lemonade, Mowed Lawn, Picked Raspberry, and Dried Marigold.  I went back and stamped in some waves with Salty Ocean and the seahorse with Picked Raspberry.  The waves and fish with bubbles are by Studio G.  The other fish, bubbles and seahorse are by Fiskar.  I fussy cut along the top waves.
 
I did the same scene on the back, except I forgot to stamp the fish before adding the Salty Ocean background.


Center panel is the beach. I stamped the shells across the top with a variety of ColorBox pigment ink and then embossed with clear embossing powder. Then I inked the beach with Squeezed Lemonade and Antique Linen and then flecked Vintage Photo. I meant to stamp the shells on the body of the beach before coloring the beach but I forgot so I did it after and embossed them. I added a little bit of the ocean at the bottom.
I did the same scene on the back of the center panel.


Back panel is the sky. I stamped the birds and palm tree using Colorbox pigment ink and embossed with clear embossing powder.  I also stamped and embossed the waves. Then I inked the sky with Tumbled Glass and Salty Ocean, the sand and ocean the same as the other layers. I added a beachy sentiment. All the stamps are by Inkadinkado.
 
Here's a picture of it completely open.

 
And here's what it looks like closed.

 
This next card combines 3 of the challenges in this card.  The first is the paint background, which I described in previous posts.  The second was the digital stamp challenge.  The host’s husband converted a piece of his art into a digital stamp for us to use for the challenge.  Isn’t she lovely?  And the final was the mistakes challenge, which is going to take some explaining.  One of the members of Artsy Inkers hosts a Bingo challenge during every party.  Before the party starts, she posts a list 25 words.  If you want to play along, you pick a 10 of the words and message her your list.  Then each day of the party, she posts 3 of the words from the list of 25.  The first person to have all 10 of their words posts and post BINGO, wins.  This time around, she picked a list of common mistakes made in stamping.  So for her challenge, you had to incorporate at least 2 of the mistakes on the list into your project, but not cover them up.  Personally, I think this challenge was a bit of a jinx because I ended up making several mistakes on this project, none of them intentional.   


Here is the list of my mistakes:

Mistake 1 - technique gone wrong - I intended to print the digi stamp and cut it on a lace scallop rectangle with my silhouette. Well the cut file was for a frame and I forgot to remove the inner cut lines and ended up with a frame and the image on a plain rectangle.

 Mistake 2 - torn paper - the silhouette ripped one of the scallops, so I ripped a bunch more so that it looks like the scallops frayed in the wind blowing the girls hair.

 Mistake 3 & 4 - blurred images and partially stamped image - the stamping of the background did not go so well.

 
 Mistake 5 - warped card stock - the paint warped the card stock.
 
You can see the mistakes better in this closer cropped picture.
 
I colored the image with Copics (I forgot to write down which ones, but I think it was YG03, YG06 and YG09 and then BG45, lips are RV10 and the eye is B02????) and went with making her a fairy. And I added some die cut flower to her hair with liquid pearl centers.
The background stamp is by Impression Obsession and I did the paint technique with metallic blue and purple paints.
I've got one more AIR 15 card to share but it deserves it's own blog post.  So I will post that one later this week.
 
Thanks for stopping by and please come again. 


Tuesday, April 28, 2015

Easter Parade Part 2 (Projects 32-34)

I'm just a few weeks late with getting these posted.  I've been in a bit of a funk lately and haven't felt like posting.  But here are a few more Easter cards involving one of my newest crafty obsessions - little dies.  These cards are inspired by the wonder scene created by Kittie.  I've been lurking on her blog: kittiekraft


This one is the first card I made creating a scene with dies.


The base is watercolor paper that I colored with Distress Inks.  All the pieces were colored with chalk, except the eggs. The chalk has a shimmer to it.  The eggs were stamped with brilliance ink and colored with Spica glitter pens.  The egg stamp is by Studio G.  To create the frame, I used a Nesties oval die.  I actually cut the frame before I started creating the scene so I could use it to make sure everything was in the frame.  I stamped the images (by My Favorite Things) in the corners with Versamark and embossed with clear embossing powder.  Then I inked it up with Distress Ink in Dried Marigold.

Here are some close-ups:

Yep, I put a single micro bead in the center of the flowers. 

Here is the next one.


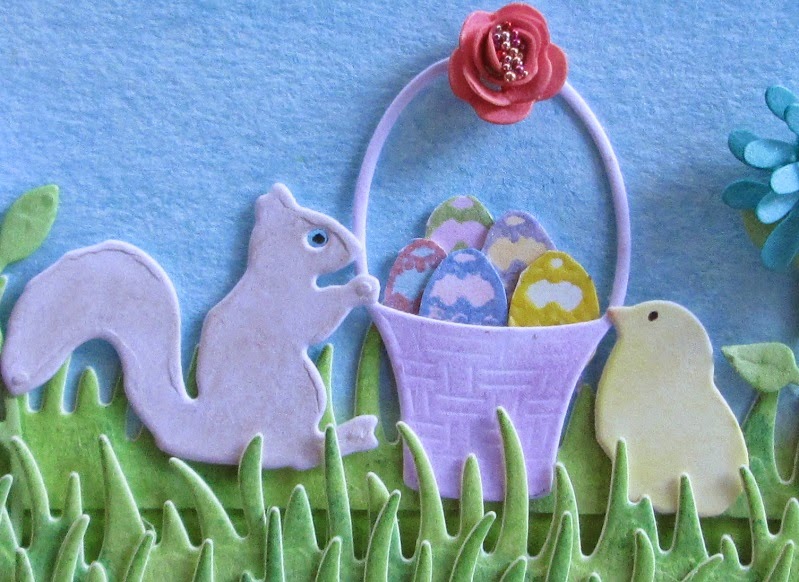
For this one, I colored the sky, grass, and flowers with Distress Ink - Salty Ocean, Tumbled Glass, Mowed Lawn, Pine Needles, Dried Marigold, Spun Sugar, and Worn Lipstick.  The eggs were stamped with Brillance Ink and embossed with clear embossing powder.  I then colored them with chalk.  The basket, bunny and chick were colored with chalk too.  The frame was down with a Nesties label die and the stamp is by My Favorite Things. 
Here are some close-ups:


And here is the last one:

Yep, that's a squirrel with the Easter basket.  I gave this one to my mom's friend that got her involved in wild life rehab.  I used Distress Inks on the sky, grass and flowers: Salty Ocean, Tumbled Glass, Pine Needles, Mowed Lawn, Shaded Lilac, Ripe Persimmon, and Peacock Feather (I think).  The eggs were done the same as on the last one.

Here are the close-ups:


Dies:
Flowers & stems (card 1) - Cheery-Lynn Designs
Leaves (card 1) - Poppy Stamps
Basket - Poppy Stamps
Bunnies - Impression Obsession
Chicks - Memory Box
Grass - My Favorite Things
Stems & leaves (cards 2 & 3) - Poppy Stamps
Flowers (cards 2 & 3) - Impression Obsession
Squirrel - Impression Obsession

Since I used snippets for all the dies, I'm entering this one over at the Playground - Pixies Snippets Playground Week 174

Thanks for stopping by and please come again.


Sunday, March 22, 2015

Swinging Tire Swing (Project 15)

I interrupting my Winterfest recap to post an Easter Card.  Mainly because I used my March received kit and I want to be able to link up to the detailed directions here when I post the card over at Artsy Inkers.  Don't worry, I share the rest of the new techniques I picked up during Winterfest in the next couple of post.  And before I start with today's project, I want to put in another plug for Artsy Inkers, Jan/ Far North (here's her blog Far North Designs) is hosting a 3 week Alcohol Inks technique challenge at Artsy Inkers.  We just started week 2 and I've learned a ton. 

Now on to the card.  When I got the kit from my swap partner and saw the tree image with the tire swing, I knew I wanted to make the swing move.

 
What I ended up doing is a variation on a spinner card.  But instead of creating a channel across the card, you just make a slightly larger hole.  Don't worry.  I'll explain.
 
First, you will need a round pop dot and 2 pennies to do this. 
 
Step 1
I colored the background with Distress Inks.  I used Salty Ocean and Tumbled Glass for the sky and Mowed Lawn for the grass.
 

In this picture, you can see where I traced the pop dot on the paper.  I had also traced the tree so I would know where my hole was going to go.  You can see in the picture that I started cutting out the circle by cutting a line down the middle.  I wish I had a circle die that was the right size, but the smallest circle die I have cuts a whole bigger than the penny, which won't work.

Step 2

Make sure the hole is a bit bigger than the pop dot, but not bigger than a penny.


See, the pop dot fits in the hole. 

Step 3

Attach a penny to either side of the pop dot. 


You can kinda see the penny through the whole in this one.

And here is a side view once both pennies are attached.  I actually had to pull on of the pennies off and make the hole a little bigger because it wasn't rocking well enough.


Step 4

Attached the piece you want to swing to the penny.


Step 5

Use pop dots or foam squares to attach the image that is going to hide you rocking mechanism.  I actually cut pieces from the pop dot sheet.  You know the pieces left behind when you remove the pop dot from the sheet.  Oh, and before I added the tree, I stenciled some clouds.  I made the stencil using a Purple Onion Design stamp (it is actually a speech bubble) and dabbed on Hero Art's Unicorn white.


Actually, I may have done the stenciling after attaching the tree.  I also added the squirrel to the tire.

And I decided that the tire was too high up.  So I pulled it off the penny and added an extension to the "rope."  The added bit of paper is a bit messy but I suspect that I'm the only one who will notice.

I also die cut grass, which I colored with Distress Ink in Mowed Lawn and Pine Needles.  I wet the paper well and added some salt for even more texture. The die is by My Favorite Things.  I kinda wish I had put the layer closest to the tree on before the tree and done it flush to the page.  Oh well. I also added the second squirrel and the Easter basket.  The basket is a Studio G stamp.  I colored it with Spica glitter pens and Copic markers and added Distress Ink in the sky colors so I wouldn't have to fussy cut the inside area of the basket.  You can see in the last photo that the tire swing is in a different position than in the first picture.  If you shake the card, the tire swing moves back and forth.


I actually had to trim the grass under the swing because it was too high.  The tree, squirrels and acorns were from my received kit, are Fawn Lawn stamps and were colored with Copics.  And they were fussy cut.  Those squirrels and acorns were a pain.

The kit also included another of the trees and some bunnies, so I think I will be making another swinging tire swing card with bunnies.

I am going to enter this over at the Mixed Media Challenge.


Thanks for stopping by and please come again.