Showing posts with label digi stamp. Show all posts

Wednesday, June 17, 2015

A Couple More AIR 15 Cards (Projects 46 & 47)


Even though AIR 15 if over, I’ve got a couple of more projects from AIR15 to share with you. 
The first card involves a z-fold.  Here is a link to the FarNorth’s blog posting with instructions on how to do a z-fold.  Here's a pic where you can see the z of the fold.
I decided that I wanted to create a scene that went across all three layers and I went with a beach scene.    Instead of cutting along the diagonal, I drew a line on both sides of the paper so I could use that as a guide for stamping.  Then I fussy cut the top part off so that instead of having a straight line.
 
The front panel is the ocean. I stamped the waves with Versamark and heat embossed with clear embossing powder. Then I stamped the fish with Versafine.  I added the bubbles, stamped with Versamark and heat embossed with clear embossing powder.  I inked around the fish with Distress Ink in Salty Ocean. I colored the fish with Squeezed Lemonade, Mowed Lawn, Picked Raspberry, and Dried Marigold.  I went back and stamped in some waves with Salty Ocean and the seahorse with Picked Raspberry.  The waves and fish with bubbles are by Studio G.  The other fish, bubbles and seahorse are by Fiskar.  I fussy cut along the top waves.
 
I did the same scene on the back, except I forgot to stamp the fish before adding the Salty Ocean background.


Center panel is the beach. I stamped the shells across the top with a variety of ColorBox pigment ink and then embossed with clear embossing powder. Then I inked the beach with Squeezed Lemonade and Antique Linen and then flecked Vintage Photo. I meant to stamp the shells on the body of the beach before coloring the beach but I forgot so I did it after and embossed them. I added a little bit of the ocean at the bottom.
I did the same scene on the back of the center panel.


Back panel is the sky. I stamped the birds and palm tree using Colorbox pigment ink and embossed with clear embossing powder.  I also stamped and embossed the waves. Then I inked the sky with Tumbled Glass and Salty Ocean, the sand and ocean the same as the other layers. I added a beachy sentiment. All the stamps are by Inkadinkado.
 
Here's a picture of it completely open.

 
And here's what it looks like closed.

 
This next card combines 3 of the challenges in this card.  The first is the paint background, which I described in previous posts.  The second was the digital stamp challenge.  The host’s husband converted a piece of his art into a digital stamp for us to use for the challenge.  Isn’t she lovely?  And the final was the mistakes challenge, which is going to take some explaining.  One of the members of Artsy Inkers hosts a Bingo challenge during every party.  Before the party starts, she posts a list 25 words.  If you want to play along, you pick a 10 of the words and message her your list.  Then each day of the party, she posts 3 of the words from the list of 25.  The first person to have all 10 of their words posts and post BINGO, wins.  This time around, she picked a list of common mistakes made in stamping.  So for her challenge, you had to incorporate at least 2 of the mistakes on the list into your project, but not cover them up.  Personally, I think this challenge was a bit of a jinx because I ended up making several mistakes on this project, none of them intentional.   


Here is the list of my mistakes:

Mistake 1 - technique gone wrong - I intended to print the digi stamp and cut it on a lace scallop rectangle with my silhouette. Well the cut file was for a frame and I forgot to remove the inner cut lines and ended up with a frame and the image on a plain rectangle.

 Mistake 2 - torn paper - the silhouette ripped one of the scallops, so I ripped a bunch more so that it looks like the scallops frayed in the wind blowing the girls hair.

 Mistake 3 & 4 - blurred images and partially stamped image - the stamping of the background did not go so well.

 
 Mistake 5 - warped card stock - the paint warped the card stock.
 
You can see the mistakes better in this closer cropped picture.
 
I colored the image with Copics (I forgot to write down which ones, but I think it was YG03, YG06 and YG09 and then BG45, lips are RV10 and the eye is B02????) and went with making her a fairy. And I added some die cut flower to her hair with liquid pearl centers.
The background stamp is by Impression Obsession and I did the paint technique with metallic blue and purple paints.
I've got one more AIR 15 card to share but it deserves it's own blog post.  So I will post that one later this week.
 
Thanks for stopping by and please come again. 


Wednesday, September 17, 2014

Squirrels! and a Thank You. (Projects 7, 8, and 9)


I’ll start with the thank you.  Ms. Di over at Pixie’s Snippets Playground featured my Autumn Greetings card.  Thank you so much, Ms. Di.  I felt so special.  Now on to the cards:
 
So I have a fair number of squirrel stamps because my mother is affectionately known as the crazy squirrel lady.  She does wildlife rehab and has rehabilitated and released many squirrels over the years.  She currently has a permanent resident of a three legged squirrel named Tripod Nubbins.  So I’ve accumulated many squirrel stamps.
 
Card 1


I stamped the squirrel with Hero Arts Shadow ink in Just Right and layered it on textured cardstock squares, putting the brown square at an angle.  The top is actually orange but it looks more yellow in the picture. The purple textured cardstock is punched with a Fiskar border punch and I stamped the sentiment with the HA Just Right Shadow ink.  It still needed something, so I took the pieces punched out of the purple and attached three to the top corner. (Do they count as snippets?) I’ve got tons of little ziplock baggies full of the punched bits from when I use border punches.  I’m such a pack rat; I can't throw the bits out. I figure I'll use them eventually.  So at least I used a few on this one. The rest went in a baggie.
The squirrel is an Inkadinkado stamp and the sentiment is by TPC Studio.
 
Card 2
 
This little guy is a digital stamp by A Day for Daisies.  I used my silhouette to print him and then cut the shape out.  I colored him with chalk and sprayed with a sealer.  The pattern paper I found in a paper storage container I bought when I first started card making, about seven years ago, and that I uncovered when I was organizing my papers a couple of months ago.  So I’ve probably had this paper that long.  I originally planned on adding some paper flowers to this piece, but I just wasn’t feeling it.  I decided to leave this one fairly simple.
 
Card 3
 
For this one, I stamped the image on X-press It paper with Memento Tuxedo Black.  I stamped the big acorn on a snippet of X-Press It paper with Memento Rich Cocoa and the acorn hat on a snippet with Memento Tuxedo Black.  I colored the images with Copics (the list of colors are at the bottom of this post) and a silver metallic color pencil.  I fussy cut the acorns with my Fiskar fingertip craft knife.  I love that thing for fussy cutting.  It takes a little getting used to but once you do, the control is amazing.  I popped the large acorn with foam squares but I just glued the hat on flat.  I wanted a little dimension but I was afraid popping it up would hide the squirrel's eyes.  The stamps are by Inky Antics.  The pattern paper and textured cardstock are from my stash.
Here's a close-up of the squirrel's acorn cap.
 
Copics:
Acorns – E21
                E23
                E25
                E27
Squirrel – E11
                E17
                E19
Basket – YR20
                YR21
                YR23
                YR24
                YR27
 
I'm entering Card 1 and 3 over at Pixie’s Snippets Playground
 
Thanks for stopping by and please come again.


Friday, May 16, 2014

Birthday Wishes

This is a card I made for my sister for her birthday.

The image is a digital image by Mo's Digital Pencil.  You can also get a real stamp of this image by Penny Black. Isn't she too cute.  I used by silhouette to print image and cut the shape out.  I colored her with Copic markers.  I added Wink of Stella glitter to the collar and tag.  Then I added glossy accents to the tag.  I added liquid pearls to the cupcake to make frosting. I think the pattern paper is by the Paper Studio, but I'm not sure.

Here's a close-up for the collar, tag and cupcake.


Thanks for stopping by and please come again.

Thursday, April 10, 2014

Duckies and Digi Meets Silhouettes


After my Bunny Trouble, I decided I would give cutting a digital stamp with my Silhouette another try.  And I decided to keep it simple this time.  Here is the finished card.

I used a digital image by A Day for Daisies.  I just found this company last month and I really like their images.
I printed the digi stamp and used my Silhouette to cut a label shape around the image. I’ve included step by step instructions for doing this, with pictures.  I then cut a mat out of pattern paper to mount the image on.  Here’s what they looked like after being cut:
 
 I colored the image with Twinkle H2Os (the eggs) and colored pencils blended with baby oil (ducks).   I actually included the mat and image in my kit for the April Kit in an Envelope (KIAE) swap I participated in over at 2Peas.  I layered it on a piece of patterned paper.  Then I added Flower Soft to the flowers to give the card some texture.  And that’s it.
Here's a close-up of the Flower Soft:
 

Step by Step - Using Silhouette to Cut a Shape Around a Digi Stamp


Step 1


Open your silhouette studios software.  To hopefully assist in identifying which icons I’m talking about, across the top, there are 12 groups of icons on the toolbar.  Down the side, there are 7 groups.   And along the bottom, there are 5. I’ll use these numbers to help identify the different icons for the functions that you will need to use. For the toolbars along the top and bottom, I’ll count from left to right, unless otherwise indicated.


Now that you’ve got the software open, go either to file and then click open or click on the little open file folder icon. The open file icon is icon #2 in group #1 along the top.


Step 2

 
In the file open window, pick the folder where you have your digital stamps.  When you do this, the window will probably be empty.  Here's a picture of what happens when I go t open the digi:
 
The first time I did this, I freaked for a second before realizing that I needed to adjust the file type.  You need to go to the bottom of that window and change the file type setting.  When you first opened the window, it was set on silhouette studio (*studio).  If you change it to all file types, your digital images should show up. 
 
Then just pick the one you want to use.
 

Step 3


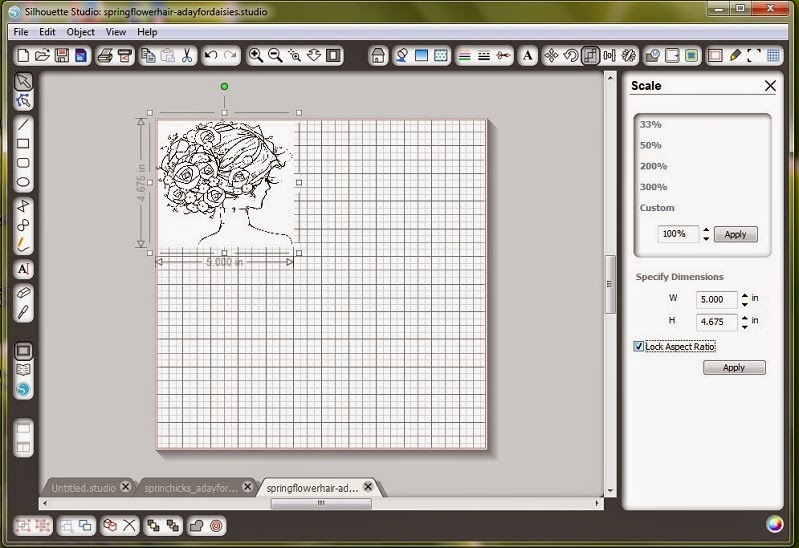
Once you have your digital image open, you may need to resize the image.  Since my ducks are just fine the way they are, I’ll show you another image that is a bit too large for a card without resizing.  This is A Day for Daisies digi stamp that measures almost 5x5 when first opened.
 
To resize, click on the icon to open the scale window.  It is icon #3 in group #10 (or the third group from the right).  If you haven’t clicked on the image, the values for the dimensions will be blank.
 
Once you click the image, you will see in the scale window the dimensions for your image.  Before you adjust the size, be sure to click the box to lock the aspect ratio.  If you don’t, you will distort your image.
 
Here's the resized image:


Step 4

Going back to my ducks, once your image is the size you want, you will want to click on the icon to open the registration mark window.  It is #3 in the last group along the top.  Once it is open, you will want to check the box for show reg marks.  When you print the image, the registration marks will print too.  Then your silhouette will read the registration marks when you go to cut.  This is supposed to ensure that your image gets cut out properly.   Here’s what that looks like.
 
At this point, you will want to move your image out of the grey area.  Since you will be putting a shape around it, for now it might be easiest to move the image to the very center. 


Step 5

Now we add the shape.  Go to your library.  It is icon #2 in group #6 down the left side and looks like an open book.  Once there, pick the shape you want to use.  I used a file that had several label shapes.  Once you click on the shape, it will open in the same document as your image.  If it is grouped with several shapes, like mine was, right click on the shapes and then pick ungroup.  Or you can click on icon #2 in group #1 at the bottom.
 
Once they are ungrouped, separate out the shape you want and delete the rest.
 
Place the shape over your image.
 
You will probably have to resize it.  You do that the same way as in Step 3.  It may take a couple of go rounds to get it just right.  And it will be easier if you zoom in (icon #1 in group #5 at the top – the magnifying glass with the plus sign in it).  Sometimes the zoom in gets carried away and brings you too close, just click on the zoom out (icon #2 in group #5 at the top – the magnifying glass with the minus sign in it).  I just eyeballed lining it up.
 
If you are going to move your image, to ensure that everything stays lined up the way you want, you will want to highlight both the shape and the image.  Then right click and choose group or click on icon #1 in group #1 at the bottom.  Now that they are grouped, the image and the shape will move as one.  You can also make copies if you want to do more than one or open a different image and start at the top.   You can put as many images and shapes on a page as you can fit.


Step 6

Now you are ready to send it to your printer. Either click on file and print or click the send to printer icon.  It is icon #1 in group #2 on the top.


Step 7

Once your image is printed, put the paper on your cutting mat and load it into your silhouette. Go to the cutting screen and select the applicable settings for the paper you used. (Icon #2 in the last group at the top).  Then you get to cut.

Step 8 - Optional


If you want to create a mat for your image, go back to your silhouette studio and ungroup your image and shape.  And you can just get rid of the image.  Then make a copy of your shape.  You will want to keep the original to figure out how big to resize the copy.  Resize the copy as described in step 3.  I just eyeballed it until it looked big enough for a mat.  To help with deciding on the size, I lined up the two shapes, so I could see how much bigger the mat was.  Once you get the mat the size you want, get rid of the original and then you can cut it out of the paper of your choice.