Showing posts with label impression obsession. Show all posts

Thursday, March 9, 2017

Tree Canvases


When I repainted the living room/ dining room in my house, none of the art work I had up worked with the new color scheme.  I went from an orangish brown/ very masculine room to a pale lavender grey with a darker lavender accent wall.  So I decide to make some art for the walls. Warning, this will be a long post.
Here's a picture of the finished project.
I had seen this video on painting a tree blowing in the wind by Amy Pearce.  And I wanted to try it but I also wanted to mix in some mixed media.  So I started by laying out the 4 12 x 24 canvases on the folding banquet table I used to use as a craft table before I got my desk.  It was the only place I had to work on that was big enough for all the canvases at once.  I roughly sketched out where I wanted the tree to go.  Then I applied the first layer of stuff.
In the bottom corner of the first canvas (the left one), I attached some roses cut with my Silhouette.  Unless otherwise noted, all of the items cut with my Silhouette or die cut were cut from watercolor paper. I attached the stuff with Tombow Mono Aqua Liquid Glue.  I added a branch cut with my Silhouette and left over from another project and a flourish from the Tim Holtz Alterations Sizzix die Elegant Flourishes.  The more dimensional leaves are wood pieces, as is the dragonfly.  The butterflies were die cuts I received in a swap.  I also stenciled a rose from a Martha Stewart stencil with matte gel.

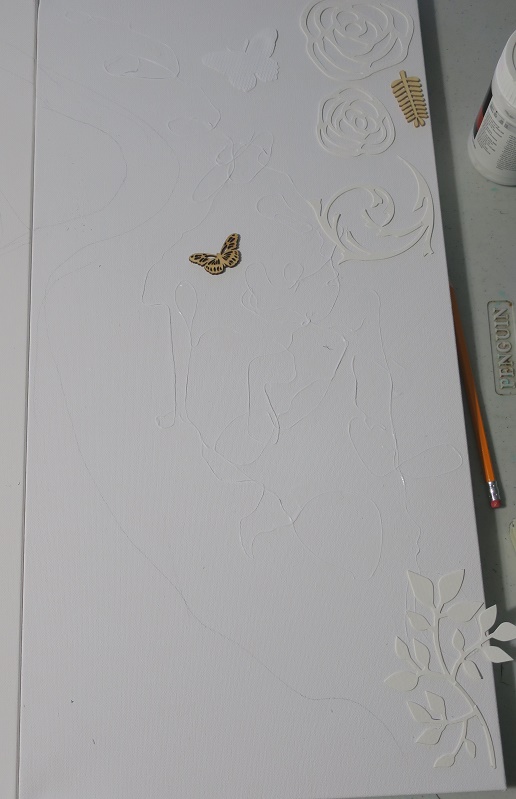
In the top corner of the first canvas, I attached some leaves and flourishes cut with Tim Holtz Alterations Sizzix dies Elegant Flourishes and Garden Greens, some cheese cloth, and more wood leaves.  I also stenciled the same Martha Stewart rose and a butterfly that I think is from a Martha Stewart metal stencil, but I’m not 100% sure. 
On the second canvas, I attached another of the swap butterflies and some thread.  I got the idea for the thread from Gabrielle Pollacco in this video.  I applied the thread with matte gel.

The third canvas got some thread and another butterfly from the same metal stencil.

The bottom corner of the last canvas got the Tim Holtz leaf die, more thread, cheese cloth and butterflies from a stencil by The Crafter's Workshop.
 
The top corner of the last canvas got more of the Silhouette roses, Time Holtz flourish, the wood leaves, a wood butterfly, another of the swap butterflies, and circles from a stencil by The Crafter's Workshop.
Once everything was dry, I did a base coat of white gesso.  Then I base painted the canvases using wall paint.  I had bought samples to test out the paint for the room.  So I used the sample of the pale lavender grey for the base coat on the canvases.  Then I set to work painting the tree.  And here is where the happy accident of using a satin wall paint comes in.  The variations in the color of the trunk is because the paint did not adhere evenly to the base paint, which I think worked out great.  Another added bonus, when I messed up on the placement of 2 of the branches, I could clean the paint off with a Wet Wipe. Then I added the flowers.  I used regular acrylic paint to paint the tree and flowers. After everything was finished, I actually went back and used more of the wall paint to paint over some of the trunk because it was too thick.  

I wanted to frame the tree with purple paint starting out very dark at the edges and getting lighter as I moved in.  And I was planning to use Fluid Acrylic Dioxazine Purple, which is a mostly translucent paint.  Given how the wall paint and acrylic paint interacted on the tree, I decided to put a base coat on first of the Dioxazine Purple paint mixed tinting base, which makes it opaque.  That’s what you will see in the next few pictures.  
Now for the next layer of stuff, which was a collection of die cut shapes, wood pieces, vellum flowers, and silk flowers.  I laid out everything before I started painting the pieces to get an idea for the layout and I took pictures.  Then I got to work on the various pieces.  Here's what they looked like before.
Now for the afters.
This flower was made up of 5 of one of the flowers from a Sizzix layered flower die set and a circle die cut. 
I sprayed all of the flowers with water first, crumple them and then folded and unfolded them.  Then I painted each flower on both sides with a metallic purple paint.  Then I used an embossing folder to emboss all of the flowers.  I went back and added either gold or metallic green paint to the raised portions of the embossing.  To assemble the flower, you fold the flowers in quarters, layer four on the circle and then put the fifth in the center.   It is based upon a felt flower I’ve made for other projects and here’s the felt flower tutorial, its the third method.  You may notice that the flower on the bottom of the first canvas layout photo looks bigger than the one on the finished canvas.  It is.  I made the bigger flower, attached it to the canvas and then didn’t like it.  So I ripped it off.   I did two different sizes of these flowers.

This flower is made with a My Favorite Things die. 

I made 2 different versions of this flower – one layering a smaller flower on the bigger and one layering two flowers of the same size.  Again I wet the paper and shaped it before painting. I also added a steampunk twist to 2 of the flowers.  I glued very small gear dies to the petals. I then painted one a dark metallic purple and one a lighter metallic purple and metallic green.  I added some gold paint to the gears.  And for the center, I used a gear painted with green metallic paint.  For the one with the two same sized flowers, I used micro beads for the center.

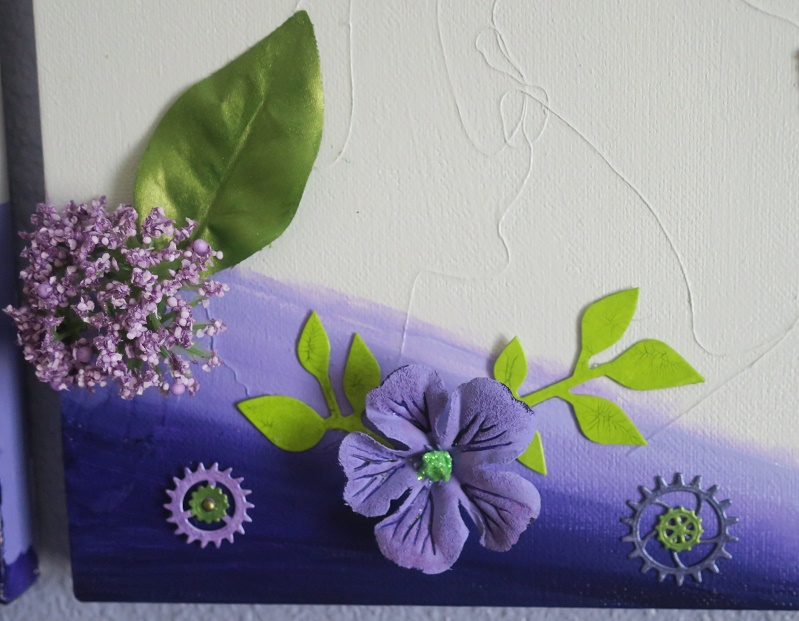
The vellum flowers are something that has been sitting in my stash for ages.  They came in a package of petals and leaves and brads, and several years ago, I went ahead and assembled all of them figuring I would be more likely to use them.  Not so much.  I unassembled them in order to paint the flowers because they weren’t the right color.  Some I colored with metallic paint and some with the Fluid Acrylic paint.  I left the leaves as is.

The wood gears and the die cut gears (Tim Holtz die for the large gears, My Favorite Things for the really small gears (?), and Memory Box for the small gears) got painted with metallic paint. And for a few, I added small pearls that got painted gold.


I also painted the silk flowers with metallic paint and added glitter to the centers (next time I’ll wait for the paint to dry completely). 


For the top corner on the last canvas, I added a piece die cut with Tim Hotlz Mixed Media die and painted with gold metallic paint. 
For the die cut leaves and flourishes, I painted them green, some with regular acrylic paint and some with fluid acrylic in Green Gold.  For some of the leaves, I embossed them with an embossing folder.  For others and the flourishes, I stenciled with Pearl Ex gold powder mixed into heavy gel medium.  And for some I added crackle gel.


Before attaching everything, I went back and added paint to highlight some of the stenciling and pieces added with the first layer. I also added crackle paste to some of the base pieces.  The large paper gear also has crackle paste. 

Then I pulled out a couple stencils I made using Tim Holtz Alterations Sizzix Trellis and Waves dies.  I added gold Pearl Ex powder to heavy gel medium and stenciled on the first canvas. I added apple Green Pearl Ex powder to glass bead medium and stenciled on the last canvas. 
For the flowers growing along the tree roots, I used hot glue to make the stalks.  I used a sanding block to rough them up before painting. The leaves are a Impression Obsession die.  I created the flowers by doing a cone shape with hot glue and added Prills.  I don’t remember what blog I saw them on but they are so cool. 

The little butterfly on one of the flowers is a Hero Arts stamp that I stamped with Versafine on tissue paper.  I used mod podge to attach it to the canvas and then painted it. I also went over it with a black Bic pen because I had to use the reverse side of the tissue paper to get the butterfly facing the right way so it was a bit washed out.   Then I used hot glue to add flower soft between the tree roots.

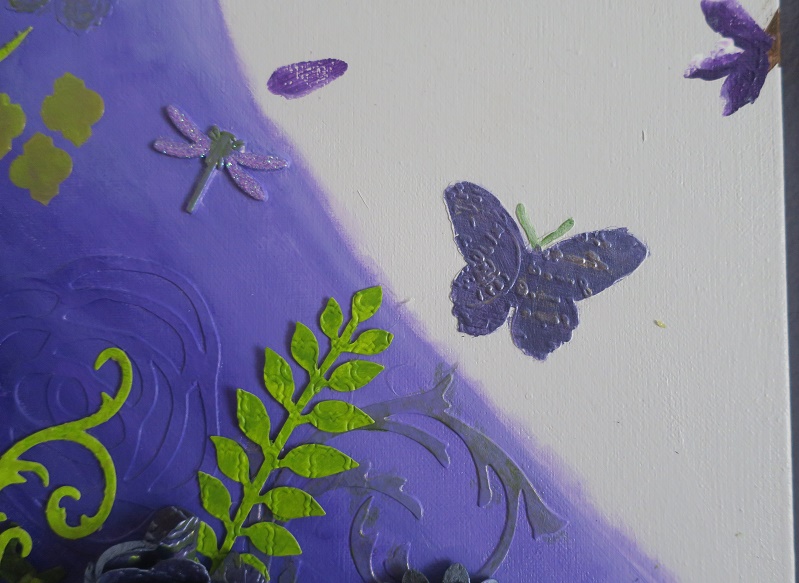
I added some dimensional butterflies to the second and third canvases.  They were cut with a Spellbinder die and painted with metallic paint.  I also added some glitter to the wood dragonfly.

Once I attached everything, I decided it needed more.  I added some additional silk flowers.  These were attached as is because they were the right color.  Also I colored the leaf with metallic green paint.

I also added a funky butterfly. 
I made one for another project (I will post that one soon) for the same room and I really like how it turned out.  So I made another one.  I die cut a butterfly with a Spellbinder die and then added the key as the body.  I made the key by first making a mold of a key (More about mold making in a future post).  After the mold set up, I put polymer clay in the mold.  After baking and cooling, I wrapped some twine around the key and added some pieces from the Tim Holtz Mixed Media die.  Then I added a coat of black gesso and then metallic paint.

Here are some close-ups of the piece.


And one more look at the whole thing.


 Thanks for stopping by and please come again.


Tuesday, June 30, 2015

Rudolph Days - Reindeer Family

I think this is a record for me, 3 posts in 3 days.  I wanted to join in the fun at Rudolph Days, so I pulled out some new dies and created a winter wonderland.


I started by creating my night sky with my Brushos in Prussian Blue and Violet.  Then I stamped the pine trees with Distress Ink in Pine Needles.  The stamp is by Impression Obsession.  Then I took my silver gelato and made a moon in the top left corner.  
 
Then I made a stencil using 2 of my circle hand punches.  I'm not sure if the bigger circles are 1/4 or 1/8, but the smaller one is 1/16, because McGill had enough sense to put the size on the handle, but the other one doesn't.  I'm not even sure who made the other punch. I smeared on some heavy gel medium (which dries clear) and sprinkled on some glitter.  I got the idea in part from this YouTube video.  I think you can kinda see the sparkle a little better in this picture.


The birch trees are a Memory Box die and I added quick drying spackle to give them some texture.  The deer and bird are Impression Obsession dies and colored with Brushos.  For the momma and baby deer, I used lt. brown and papa deer was dk. brown.  For the bird, I used brilliant red.
 
For the snow mounds, I freehand drew cut lines as guides for cutting them.  Then I panted them with Elmers glue and cover them with glitter.  I used rolled pieces of scor-tape to attach everything.
 
I used snippets for all the die cuts and the snow mounds.  So in addition to Rudolph Days, I'm going to enter this over at the Playground.


Thanks for stopping by and please come again.


Saturday, June 20, 2015

Christmas Z-Fold Card Insanity (Project 48)

Warning: this will be a really long post with lots of pictures and detailed descriptions of one card.

As promised, here is the second Z-fold card I made. And this was one of those ideas that sounded really good in my head and then about 1/3 of the way through, I realized that it was actually insane. I think I spent about 10 + hours making this card. And I'm not sure if I'm going to give it away or keep it for myself. I'm just not sure I like anyone I like enough to give this too. :-) I'm either going to put it out with my Christmas decorations or maybe add some squirrels and give it to my mom since she puts all the cards I've made for her over the years out with her Christmas decorations.


I started by drawing a triangle on each section to create a base shape for the tree. Since I improvised on the z-fold cut to make my tree base and insure that the whole tree lines up when the card is folded, I've included at the bottom of the posts photos and an explanation of how I did it.

Since I was going to use die cut pine needles to create the tree, I knew there would be gaps. So I used painter's tape to mark off the partial triangle on the front section and inked it with Distress Ink in Mowed Lawn and, what else, Pine Needles. I wished I had taken some pics while I was doing this.

 I die cut the pine needles from snippets of watercolor cardstock. It is an Impression Obsession die.  Then I colored them with Distress Ink in Mowed Lawn and Pine Needles. I know it would have been faster to color the paper first and die cut second but then the sides would still be white, which would have bugged me. I have slight crafting OCD tendencies. Then began the epic assembly process by attaching each one individually. Here's a pic of what the individual pine needles look like, with a dime for some perspective on the size. For non-Americans, a dime is about 1.8cm in diameter.

 
The trunk is a piece of brown floral tape attached at the top (before I added the pine needles). The bottom 2 rows of each section were attached with glossy accents and the rest were attached with rolled pieces of scor-tape to give some dimension.  There are 43 pine needle branches on the front section.


I couldn't decide if I liked the full sun or in the shade photos better, so included both.  For the garlanded, I attached pieces of ribbon that I folded the edges under the pine needles to give the illusion of it wrapping around the tree.  


Here's the middle section, with the front folded back, so you see the middle section and the bottom section.  There are 54 pine needle branches on the middle section.

 
And the full sun picture.


Here it is with the whole card unfolded.  This is the back of the card.  For the sentiment, I die cut the red and white cardstock with Spellbinders' nesties.  It is one of the label sets but I forget which one.  The sentiment is by Impression Obsession. I stamped with ColorBox Pigment ink in Evergreen and since it usually takes forever to dry, I heat embossed it with clear embossing powder.  I realized when I went to attach it that it was a little to big for the section, so I had to attach it at a wonky angle to fit.  I added a couple of gems.  I think that was because I smudged some ink on the white cardstock. 

 
Here's just the middle by itself.  I realized as I was drafting this, I didn't have a pic of just the middle without the bottom layer showing, so I took another pic but by that time the sun was hiding.


Now for the bottom section (the inside of the card), which had the full tree on it.  The star on top of the tree is a die by My Favorite Things colored with metallic watercolor paint and with a gem at the center.  And this section has 69 pine needle branches.  So that's 166 individually colored and attached pine needle branches. Yep, I'm a little crazy. In full sun:
 
 
And in the shade.  I added a dime to give perspective on the ornaments.  


The ornaments are My Favorite Thing stamps. I used the pieces of cardstock cut off from the card base for stamping them. The first batch I stamped with Versafine. Since I didn't stamp nearly enough the first time, I stamped the second batch with Versafine and embossed with clear embossing powder, because after I colored the first batch, the lines on some of the ornaments didn't show up as well. On some of them I embossed a snowflake with clear embossing powder. It was part of a three snowflake stamp also by My Favorite Things that I did surgery on. I colored them all with metallic water colors, added glossy accents, cut each out and attached with rolled pieces of scor-tape. I also added sequins with a dot of Stickles in the middle and gems for sparkle. This close-up (of the bottom section) shows the ornaments better.
 
 
You can really see the sparkle in the full sun one. Again this is the bottom section. 

 
When I attached the trunk, I only adhered the top down because I wanted to be able to tuck the ribbon for the tree skirt under the trunk so that it would look like the tree skirt went around the whole trunk.  It took a bit of trial and error to get the tree skirt to work.  I used a snippet of wired ribbon to create the skirt, tucking it behind the trunk and then folded over the top. The presents are My Favorite Things stamp, except the gold one, which is Hero Arts.  I stamped all but the far left one on snippets of pattern paper, embossed, used the watercolor metallic paint for the ribbons and fussy cut. The far left one was stamped on snippets of plain white cardstock and painted with metallic paints.    

In this close-up of the front section, you can see that I got better at attaching the tree skirt as I went along.  The presents were a strategic choice to hide the worst of the lumps.

 
Here is the card fully open to show the inside.  The inside sentiment is by Stampendous.  Oh and the green pattern paper on the 2 non-tree panels were snippets as well.
 
Full Sun


Partial Shade


Since this card is literally covered with snippets, I'm going to share it over at the playground.
 
 
Thanks for stopping by and please come again. 
 
Now for the detailed directions for creating the card base, which I figured I would put at the bottom so you didn't have to read through/ scroll through them to get to the good stuff, but you could look if you were interested.
 
For the Z-fold you need a piece of cardstock that is 6 inches by 12 inches (15.3 cm by 30.6 cm - I think I have conversions right).  I used a scrap piece for these pics because I forgot to take pics while I was making it and the piece was only 5.75 inches by 12 so if it looks a little off that’s why.  Here's a picture on the starting piece with all the measurements on it.  They will be explained in steps 1-3.
 

1) You are going to measure up 3 inches (7.6 cm) on one side and draw a diagonal line to the opposite corner.  That is your usual cut line for a z-fold line. 
 

2) Flip the paper over and draw the diagonal line again, making sure you measure up the 3 inches on the same side that you did on the front. This will give you a guide line for the middle section, which when the card is folded is actually the back of the piece of paper.
 
 
 3)  Then score at 4 inches (10.1 cm) and 8 inches (20.2 cm) across.  These are your fold lines.  That way each section is 4 inches wide.  Here’s a pic of the front with all the measurements and the diagonal cut line draw in.
 
4) Fold you card at the 4 and 8 inch score lines to make your Z. 

5) Now, on the front panel, find the center point of the top and draw a triangle with a ruler.  I also added the trunk and line for the tree skirt. The diagonal line is the cut line.  The straight line is showing that it is 4 inches wide.


6) Now cut just the front section along the cut line and then up the folded edge to the top.  That way you can see the middle section when the card is folded.
 
 
7) Line the ruler up using the edge of the tree on the front section to draw the top of the tree on the middle section.


8) Then on the front panel measure up from the bottom of the card to the bottom of the tree. 
9) Use that measurement to draw the bottom line of the tree on the middle section. 
 
 
10) Then connect the bottom of the tree to the top part you already drew. 
 
 
11) Again, cut along the cut line (for the middle section this time) and the fold.  This is where drawing the cut line on the back comes in handy.  Now you can see the bottom section when the card is folded.


12) Repeat steps 8 to 10 for the back section.  When you go to cut this time, cut along the cut line until you get to the tree top.  Then cut up the tree top then down the other side to the cut line, across the cut line to the fold and then up the fold.  Now you have a tree base.  


Now you too can join my insanity.  And I did warning at the beginning this would be a long one.  So thanks for hanging in there for all my long drawn out explanations.